Showing posts with label Timmel. Show all posts

27 July 2012

My Old Friend, the SWAP

SWAP = Sewing with a Plan

Many of you are familiar with this concept, having either read about it or participated in the contests.  Back in the day, Julie of Timmel Fabrics (Julie, if you're reading, I sure do miss you and your fabric!) ran the SWAP contest.  These days, the lovely folks over at Stitcher's Guild Forum have taken over the reins.

The SWAP concept (and subsequent Timmel Fabrics contest) was based on an idea presented in Australian Stitches magazine about a decade or so ago.  The idea was to create a wardrobe that is cohesive, both in colour and style.  The different garments (one jacket, two pairs of pants, two skirts and six tops were required in the original SWAP contest) in a grouping should work together to provide the wearer with several mix and match outfits.

I used to do almost all of my sewing in SWAPs.   However, over the last while I had gotten away from sewing this way.  Well, earlier this week I was perusing back issues of Australian Stitches magazine.  Lynn Cook (one of the editors) had put together a lovely wardrobe (see issues Vol. 15, No. 9 to Vol. 16 No. 4 if they are available to you).  In the first issue, she sewed up a jacket, two skirts, a pair of pants and two tops in black, white and red fabrics.  In each consecutive issue, she added to the mix with further garments.  Along the way, she added in other colours (orange, teal, bone, lavender, etc).  In the end, she created a beautifully coordinated wardrobe. 

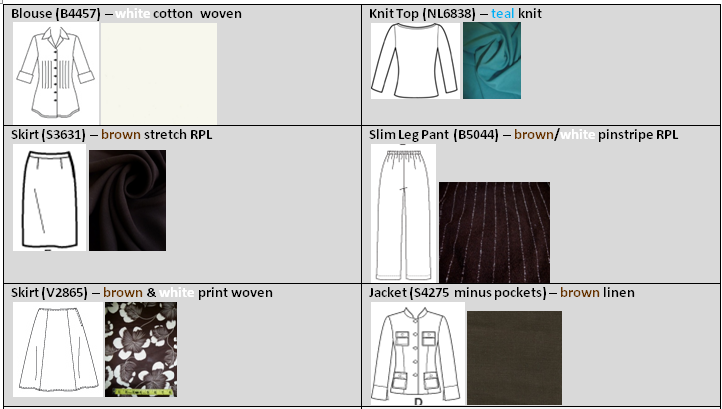
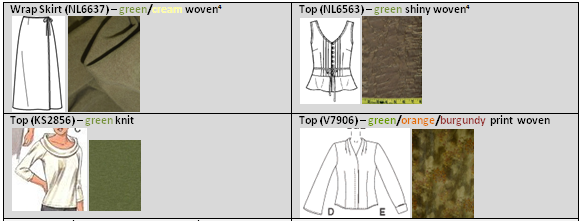
This was very inspiring to read, so based on her plans, I put together my own version:

SWAP Phase 1 - based on Vol. 15 No. 9:

SWAP Phase 2 - based on Vol. 15 No. 10:

SWAP Phase 3 - based on Vol. 15 No. 11: 

SWAP Phase 4 - based on Vol. 15 No. 12:

SWAP Phase 5 - based on Vol. 16 No. 1:

SWAP Phase 6 - based on Vol. 16 No. 2:

SWAP Phase 7 - based on Vol. 16 No. 3:

SWAP Phase 8 - based on Vol. 16 No. 4:

The vast majority of fabrics were in my stash.  However, I do have three fabrics that are still alluding me at this point (ETA: I found three fabrics that finished off my SWAP, so the storyboards have been updated).  The patterns are a mix of recent and older ones that I had in my possession.  I may add or modify as I go along if I find it necessary.

I have already started on the plans above - one garment is finished and several more are cut out.  So, stay tuned...

8 December 2009

More Cashmere Love

Another outfit based around one of my cashmere purchases of late - the dark chocolate brown cardigan. It is worn over a Loes Hinse Bianca top, made from an onionskin knit with an all over beige and dark brown floral pattern on a terracotta background from Textile Studio (which sadly no longer sells fabric). The pants are my TNT favs - the Loes Hinse Hepburns. The fabric is a brown and orange herringbone RPL from Timmel Fabrics, another of my favourite stores that is now closed down.

The finishing touches are a pair of funky striped knee socks and a pair of caramel coloured leather Clarks double strap mary janes.

This was a comfortable, yet pulled together casual look for work.

19 November 2009

Me & My Oxfords

I know I said I wouldn't be posting because I'm in Florida, but I scheduled this posting before I left. I couldn't resist showing off another new pair of shoes in action.

First the outfit breakdown. I wore a Land's End long sleeved T-shirt in white underneath a chocolate brown ruffle front knit tank I made in the summer. The skirt is a wearable muslin I made for my Chanelish suit from the last Timmel SWAP. My accessories are a thin brown leather belt to cinch in the waist, some cool crochet Hue tights and of course, my cute suede/leather Oxfords.

I put this outfit together last week and I like how it came out. Considering I've never worn Oxfords, much less high heeled Oxfords, I think I did a respectable job of styling them.

Whatcha think?

12 November 2009

Purple Nurple

Not much sewing has been going on around Chez HZC lately (due to exploding life syndrome). So in a desperate attempt to ensure that my faithful readers don't abandon me, I will be presenting some of my daily outfits over the next while (at least until I get my arse back in front of my Kenmore). Practically everything I wear has come off my sewing machine, so at least I'm still remotely on point.

I made this top and skirt in January of this year, but didn't get any photos of myself wearing them. I don't wear a lot of purple as it is tricky to find a shade of purple that doesn't clash horribly with my hair. I think this outfit works because of the copper mottling in the lace top that matches my hair colour.

To finish off the outfit, I donned a pair of dark purple tights and a funky mother of pearl and silver filigree pendant necklace. The shoes are a new acquisition from Naturalizer - a funky pair of low heeled mary janes in a gorgeous pinot noir (purply burgundy) pebbly leather. Not only are they comfortable for clomping around school all day long but they are so darn cute!


**Although I have never been the perpetrator nor the victim of the dreaded "purple nurple", I have always been amused by this rhyming phrase. However, I can't help but wonder who came up with such a cutesy name to describe this weird bullying technique. Yeesh.

3 November 2009

Bootie or Not Bootie

In a previous post, I professed my growing love for the skirt, tights, bootie combo that I'm seeing around the fashion blogs as of late. Some commenters agreed with me that the look is potentially super cute and others were not sold on the whole thing. I must admit when I first saw booties worn with skirts, I thought it looked ridiculous. However, as time has past, I think I have become more accustomed to the silhouette and I now think it's quite fetching.

So, today I put together my first bootie-tights-skirt (I first typed this as tight-bootie-skirt and got a good chuckle) outfit. The skirt is Simplicity 4422 (view F), done up in a burgundy tweed flecked with dark brown and tan. The top is Vogue 2759 in a dark brown knit.

I must say that I felt pretty good in the outfit all day long and received compliments from both students and colleagues. Looking at the photo though, I think next time I will try and match the colour of the tights more closely to the bootie for a longer leg line. As well, I never tuck in my tops, so this was a real departure for me, but it actually doesn't look as bad as I expected. Last but not least, this outfit makes the pesky 10 lbs I want to drop a little more obvious than I would like - time to hit the treadmill and weight machine harder. So, all in all, pretty good, but a few things to keep in mind for next time.

So, what do y'all think? Yay or nay? Bear in mind that I am venturing into new territory here, so please be gentle.

17 September 2009

It Is Easy Being Green

Pattern: Simplicity 3874 (view B shortened to a top) & Loes Hinse Hepburn Pants (view A).


Size: Top - size 8;

Fabric: Top - beige popcorn stitch tencel knit from Wazoodle; Pants - heathered green RPL from Timmel Fabrics.

Project Photo:

Comments: I have had a SWAP plan put together for a while now. I had originally debated about joining last year's Stitcher's Guild SWAP contest using this plan, but in the end I decided to pass. Unfortunately, passing on the contest also caused me to forget about my plan. Well, no more, the plan has been unearthed (and revamped - more on that later) and the sewing has begun.

Behold the first two pieces from the "It Is Easy Being Green" plan. The pants are my TNT Hepburn pants. The top is a shortened version of S3874. I love this pattern as a dress, so I figured why not crop it up into a top. I like the result - basically a T-shirt that has been given some extra interest due to the under bust tie.

Conclusion: Two great transitional pieces for fall. Now, I just need to find some time in my busy schedule (I tell ya, all this workin' for a living really is cramping my sewing mojo!) to continue working on this SWAP plan.

14 August 2009

Hepburn Pants Zipper Tutorial

I know when the Loes Hinse Hepburn Pants pattern first came out, there was concern over the zipper insertion. Seamstresses far and wide were stymied by the instructions included in the pattern and boy, were they pissed off! Chaos ensued, the oceans boiled and there was a plague of locust...

Needless to say, I was a bit apprehensive to try these pants myself. However, when I did, I had absolutely no problems at all. I followed the instructions and sailed right through, no fuss, no muss. Now, before you think what a pompous bitc...ahem...gal, let me tell you that I usually excel at difficult tasks and then get totally stymied by the simplest things. Just call me the idiot savant.

So, I tossed together a Hepburn Pant zipper tutorial. Now, with extra visuals! Hopefully, this helps out a frustrated sewist or two. The following is the construction of view A (the high paper bag waist) as per the steps listed in the pattern instructions. View B is constructed in much the same way. Note that all the pictures can be clicked on to make them bigger for better detail.

Steps #1-13: Just follow the instructions - I don't think there's any wackiness here. For my pants, I tend to omit the pockets. I enjoy a good pocket, but I don't love the extra padding in the hip area, so I rarely use them.

Step #14: Notice on the front pattern piece there is a dot at the bottom of the fly opening (the dot is circled in red on the pattern piece and on the corresponding piece of fabric in the photo). You will stitch, right sides together, the two legs of the pants from that dot, around under the crotch, all the way to the top of the back waist. The stitching line creates a big "J" in profile.


Press open the seam. In the photo you can see that your pant legs should be completely attached together at the crotch, except for the fly region.


Steps #15-16: I think the construction of the waistband facing is well explained. Just remember that when the instructions say "right" and "left", it is referring to the location of the piece as it will be worn on the body when the pants are complete. Also, be sure to mark the dots in the lower corner of the right and left waistband facing pieces - they will come in handy later. As a side note, I used a lightweight white knit interfacing for this slightly stretchy RPL (rayon, polyester, lycra) fashion fabric.

Step #17: Turn pants right side out. With right sides together, pin the right fly front panel to the the right waistband facing (left photo). Sew together from the top of the waist to the marked dot and clip to the dot (right photo).


Step #18: Press this small seam open. The unstitched portion is pressed toward the waistband facing.


Step #19: Fold back the right fly panel at centre front, use the marked notched as a folding guideline and secure with pins. The fly panel and pant front should now be right sides together. See photos for Step #20 to see the fly panel folded properly.

Step #20: Continue pinning the waistband facing to the pant, right sides together, around the entire circumference of the waist. Sew facing to waist using a 1/4" seam.


Step #21: Fold waistband facing away from the pant. Understitch (sewing through both the facing and the seam allowances) close to the seam line around the circumference of the waist - you will not be able to understitch all the way into the right side. In the photo below, this is the right side of the back of the pants with the waistband facing at the top and the body of the pant below. You can see the understitching on the facing.


Step #22: Turn facing right side out and press. The photo shows the inside of the right front of the pant in the fly region.


Step #23: To locate the position of the top zipper stop on the left side of the fly, transfer the dot from the waistband facing to the same position on the fly. To do this, fold down the waistband facing onto the fly and mark the position of the dot onto the fly (marked with a pin in the photo).


Place the zipper face down on the edge of the fly and stitch in place. I have lined up the top zipper stop with the pin from the photo above.


Step #24: Turn zipper right side out and stitch along teeth.


Step #25: Press right fly along fold line.

Step #26: Stitch one end of the elastic to the loose seam allowance of the right waistband facing.


Turn elastic into the facing, lining up the elastic with the long edge of the facing, being sure the elastic does not twist.

Step #27, 28: Fold the seam allowance, wrong sides together, on the left side of the facing. Attach the elastic here, as shown in the photo.


Step #29: Attach the elastic to the long edge of the entire facing (I used my serger to attach and clean finish in one sweep). The elastic has to be stretched to distribute it evenly along the facing edge.


Step #30: To finish the left side of the fly, fold down the facing and stitch it to the fly region.


Step #31, 32: To finish the right side of the fly front, the instructions have you attach the zipper and topstitch the fly all in one step. I prefer to attach the zipper first and then topstitch in two separate steps. I feel this gives me greater control over this procedure. Below is how I do it.

Attach zipper to the right fly region. Line up the edge of the zipper tape with the edge of the right fly flap. Slip the top portion of the zipper tape under the right facing. Stitch the zipper in place along the teeth. Be sure to only stitch through facing - do not stitch right through to front of pant.


Step #33: Topstitch the fly front, through all layers. I like to mark my topstitching line with chalk.


Step #34-38: Follow the given instructions. The top of your pants should look like this:


And, voila! Hepburn pants the HZC way!

ETA: To see the completed Hepburn pants, click here.

4 August 2009

Butterick 4986 & Kwik Sew 2948 & Simplicity 7816

Pattern: Butterick 4986 (view A) & Kwik Sew 2948 & vintage Simplicity 7816 (view 4 - minus the pockets)


Size: Top (B4986) - size 8; Tank top (KS2948) - size XS; Skirt (S7816) - waist 24" and hip 34.5"

Fabric: Top - Blue waves rayon lycra knit from Lucy's Fabrics; Tank top - teal slinky knit from Timmel Fabrics; Skirt - Kiwi waffle weave linen from Fabric Mart.

Project Photo
:

Comments: Sometimes ya just gotta have a bright outfit! I love teal and lime green together - it just screams summer to me. So when I noticed how well all these fabrics coordinated, it was a no-brainer to create an outfit.

The Kwik Sew tank top is the only pattern of the three that I have sewn with before and it is a TNT. Easy to put together and very flattering for a simple shell.

In the past, I have tried several twist top patterns (the kind that is an actual wear alone top like the ones in Simplicity 4076) and I never have luck with them. As a very small busted woman, I could never get the top to look right - even with a small bust adjustment on these patterns, the bodice still looked saggy and unfilled. Not to mention, these tops are always so insanely low cut, which is not a good look if you have a fairly bony upper chest like I do. However, B4986 caught my eye when it first came out because of the nifty twist on the front and the fact that it is a cardigan style, rather than a stand alone T-shirt. Well, I am a huge fan of this pattern - it fits well, it's easy to make and it's super cute!

The skirt is made from a vintage pattern that I have had in my stash for a while. I like all the different options provided in this pattern. I plan on making all of them at some point because of the success I had with this skirt. My only issue with the skirt is the fault of the fabric - it wrinkles like mad. Normally, I'm cool with the rumples in linen, but this particular fabric is evil incarnate - it wrinkles even if you look at it sideways. Oh well, next time I make it, I'll use better fabric.

Conclusion: A fun and funky summer outfit that reminds me of sherbet (umm, sherbet...).

16 July 2009

Simplicity 5197 & Loes Hinse Oxford Pants

Pattern: Simplicity 5197 (view A) & Loes Hinse Oxford Pants (view B)


Size: S5197 - size 8; LH Oxford Pants - size S

Fabric: Tunic - Embroidered teal cotton from Timmel Fabrics; Khaki tencel woven from Nancy's Notions.

Project Photo
:

Comments: I have had this S5197 tunic cut out and ready to go for over two years, but it just sat in my to-do pile unloved and ignored. Well I finally felt bad enough about allowing it to languish for so long and decided to sew it up. Unfortunately in the interim, I managed to lose the instructions. Not a tragedy, but irksome none the less. So, I did it my way and made it up as I went along! It turned out well - the slits at the cuff and sides of the hem, as well as the collar are cute design features.

The cropped pants are simply shortened Loes Hinse Oxfords (which is one of my TNT pant patterns). Although I'll be the first one to admit that cropped pants can make those of us that are vertically challenged look all the more stumpy, I'm okay with it. Cropped pants are cool and comfortable in the summer for occasions when shorts are inappropriate. Normally for these circumstances, I turn to a skirt, but a girl likes to have options, ya know?

Conclusion:
I was looking for a comfortable, casual outfit to wear for a day out shopping or visiting with friends. I think I got it!

30 May 2009

...6...

Here is another version of Simplicity 4599. I made this skirt last year at the end of the summer and up until now I neither wore it nor posted about it. So, it was past due to introduce this garment to the world!

Originally, I had planned on making BWOF 4/07 - 104 (the line drawing can be seen to the right), but when I made a muslin of this skirt, it was obvious that it was not going to happen. The front and back are cut from the same pattern piece, which is laid on the the fabric with the fold at centre front and centre back. This puts the bias portion of the fabric at the side seams. This is not a good thing. When the skirt is sewn up, most of the fabric hangs right at the side of the body, over the hip. Now, if you have small hips and need a multitude of bulk there, then this is the pattern for you. If, however, you are like me and nature has already provided ample padding in that area, run away from this pattern or risk looking like a pommel horse. So, out came Simplicity 4599 and I never looked back.

The top (BWOF 5/08 - 103) however, was a new pattern for me and it required a few small tweaks. Like many of the other seamstresses that have made this top, I extended the front at the hem so my stomach would be covered and I raised the neckline - both alterations make this a work friendly top. I got several comments on this top when I wore it to school - the "bow" on the front elevates this top from plain old T-shirt to something a bit more interesting and sophisticated.

The skirt fabric, a medium weight cotton pique, was purchased from Sawyer Brook and the wide-ribbed knit top fabric is from Fabric Mart.

So, here I am, heading out the door for another long day in the trenches. Thankfully, the last day of classes is June 16th. Final exams start on June 17th and my marks are due June 23rd. Graduation is June 24th and my last day of work is June 26th. Then it's 9.5 weeks of work free bliss...ahh...